- Allow or deny specific chains, tokens, bridges, and exchanges.
- Filter chains by ecosystem type (EVM, SVM, UTXO, MVM, TVM).
- Preselect default source and destination chains.
- Choose default tokens for both source and destination.
- Set the amount of the source or destination token.
- Specify a destination address.
- Configure integrator fees with static or dynamic fee calculation.
- Enable gasless/relayer routes for eligible transactions.
- Configure blockchain providers for Ethereum, Solana, Bitcoin, Sui, and Tron ecosystems.
- Customize various LI.FI SDK settings through the
sdkConfigconfiguration.
LI.FI SDK configuration
The LI.FI Widget is built on top of the LI.FI SDK, leveraging its robust functionality for cross-chain swaps and bridging. The sdkConfig option allows you to configure various aspects of the SDK directly within the widget. Let’s look at the example of configuring private RPC endpoints using the sdkConfig option.Blockchain providers configuration
The LI.FI Widget supports multiple blockchain ecosystems through dedicated provider packages. You can configure providers for Ethereum (EVM), Solana (SVM), Bitcoin (UTXO), Sui (MVM), and Tron (TVM) chains.Initialize form values
The LI.FI Widget uses a number of form values that are used to fetch and execute routes. These values arefromAmount, fromChain, fromToken, toChain, toToken, toAmount, and toAddress.
They are most often set by using the Widget UI but they can also be initialized and updated programmatically.
By configuring these options, you can streamline the user experience, ensuring that the widget is preloaded with the desired chains, tokens, amount and address for a swap or bridge. This reduces the need for manual input and helps guide users through the intended flow.
You can initialize these values by either:
-
Widget config - by adding
fromAmount,fromChain,fromToken,toChain,toToken,toAmount, ortoAddressvalues to the widget config. -
URL search params - when
buildUrlin the widget config is set totrue, by adding them to the URL search params in the url of the page the widget is featured on.
Initializing by widget config
The LI.FI Widget allows you to preconfigure default chains and tokens, making it easy to set up your desired swap or bridging parameters right from the start. Below is an example of how to configure the widget with specific default chains, tokens, amount, and send to address values.minFromAmountUSD parameter (number) to ensure users meet minimum transaction requirements.
Initializing by URL search params
To initialize form values in the widget using URL search params you will need to ensure thatbuildUrl is set to true in the widget config.
Config values override URL search paramsIf you want to use URL search params to populate the widget’s form values on initialization (or page load) its important that those form values are NOT featured in the config object used to initialize the widget. fromAmount, fromChain, fromToken, toAddress, toChain, and toToken should NOT be set on the widget config in order to allow the URL to perform the initial set up of the widgets state.On first page load if you have form values in both the config and the URL then the URL search params will be rewritten to match the config values and the widget form will be populated with the values presented in the config.
Update form values
After the widget has initialized there are two ways you can update the form values in the widget- Using the widget config - this uses reactive values in the config and requires some management of those values for updates
- Using the formRef - this provides an function call that you can use to update values in the widgets form store.
Note that when
buildUrl is set to true in the widget config both methods
should also update the URL search params as well as the value displayed in the
widget itself.Updating by widget config
Once the widget has initialized you can update the form values in the widget by updating the widget config. To perform an update you should only include the form values in the config that you want to change and ensure these changes are passed to the Widget. For example, if you want to change the fromChain and fromToken and nothing else you should include only include those values In addition to the form values you want to change you should also set a formUpdateKey. This needs to be a unique, randomly generated string and is used to ensure that the form values are updated in the widget - essentially forcing an update. This can avoid some edge case issues that might arise when setting values in the widget via a mix of config and user actions via the widgets UI. Here is an example of what your config would look like.undefined. This example resets only the fromChain and fromToken form values.
undefined used to reset a the widgets form value to an empty state. The absence of a property from the widget config object means that property will remain unchanged.
State management with widget config
When using config to update widgets form values it is often a good choice to consider using an application state management library to store your widget config. There are many options to choose from such as Zustand, MobX, Redux or even React context. For example, if you were to use Zustand as your state management tool you could use Zustand’s API to access and set values on your config from any part of your application. In addition you would also be able to use Zustand’s equality functionality, such as the built-inshallow function, to ensure that your widget config is only used to update the instance of the LiFi Widget when necessary. This should be beneficial for optimizing re-renders.
You can find an example that uses Zustand to manage widget config in the widget repository.
Updating by form ref
This method provides developers a way to set the form values directly in the widget without making changes to the widget config. By passing a ref object to the widget you can access a function to set values directly on the widgets form state. See the example below.setFieldValue function.
setFieldValue function can be called to set the form value, note that setUrlSearchParam will ensure the url is updated if you have buildUrl set to true in your widget config.
Here are some examples of usage.
Configure route options
The widget provides several options to control route fetching and selection behavior.Configure integrator fees
You can configure fees that will be collected on each transaction. There are two approaches:Static fee
Set a fixed fee percentage for all transactions usingfeeConfig:
Dynamic fee calculation
UsecalculateFee function for dynamic fee calculation based on route parameters:
Only use one of
fee or calculateFee, not both. If calculateFee is provided, it takes precedence over the static fee value.Configure allow and deny options
We provideallow and deny configuration options to control which chains, tokens, bridges, and exchanges can be used within your application. Here’s how you can set up and use these options:
Filter chains by ecosystem type
You can also filter chains by their ecosystem type (EVM, SVM, UTXO, MVM, TVM):Configure from/to chain filters separately
You can apply different filters to source and destination chain lists:Token filtering
To control which tokens appear in the from and to lists, use theallow and deny options:
- If defined at the top level of the
tokensobject, they apply to both lists. - If defined inside the
fromortoobjects, they apply only to that specific list. - If an
allowlist is defined, only tokens included in it are allowed. If noallowlist is defined, all tokens are allowed unless they are explicitly included indeny. If a token appears in bothallowanddeny, theallowlist takes precedence. - A token must pass both the top level
allow/denycheck and the check for the current list (fromorto) to be considered allowed. - Token filters are applied per chain. When tokens are allowed/denied for a specific chain, only that chain’s tokens are affected. Other chains remain unfiltered and show all their available tokens.
Featured, popular, and included tokens
Apart from theallow and deny options, the tokens option can be configured to include other tokens, featured tokens, or popular tokens that will appear at the top of the corresponding list of tokens.
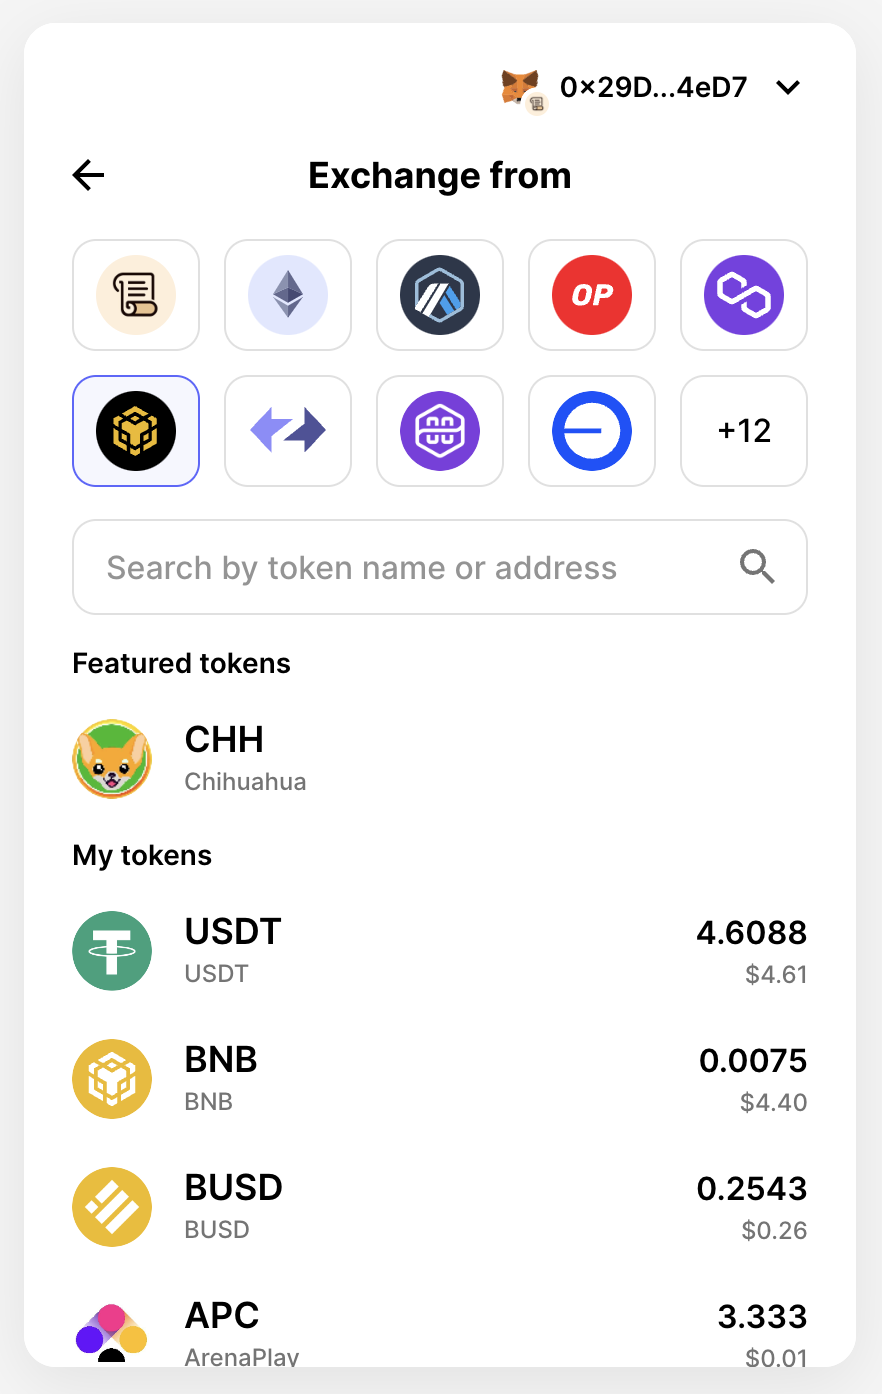
With featured tokens
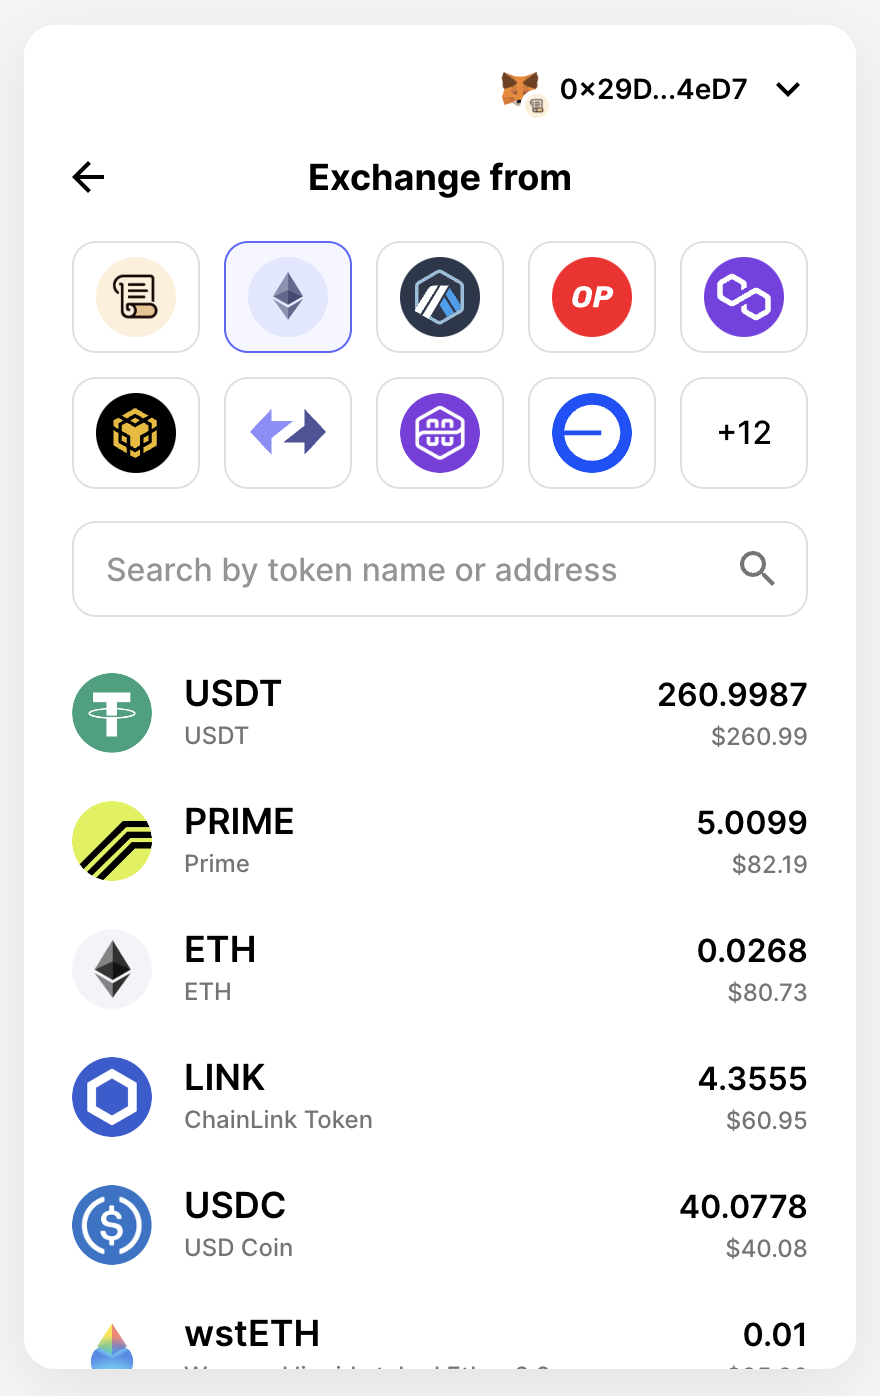
Without featured tokens
Destination address
There are use cases where users need to have a different destination address. Usually, they can enter the destination address independently. Still, the widget also has configuration options to pre-configure the destination address or create a curated list of wallet addresses to choose from.
Send to wallet button
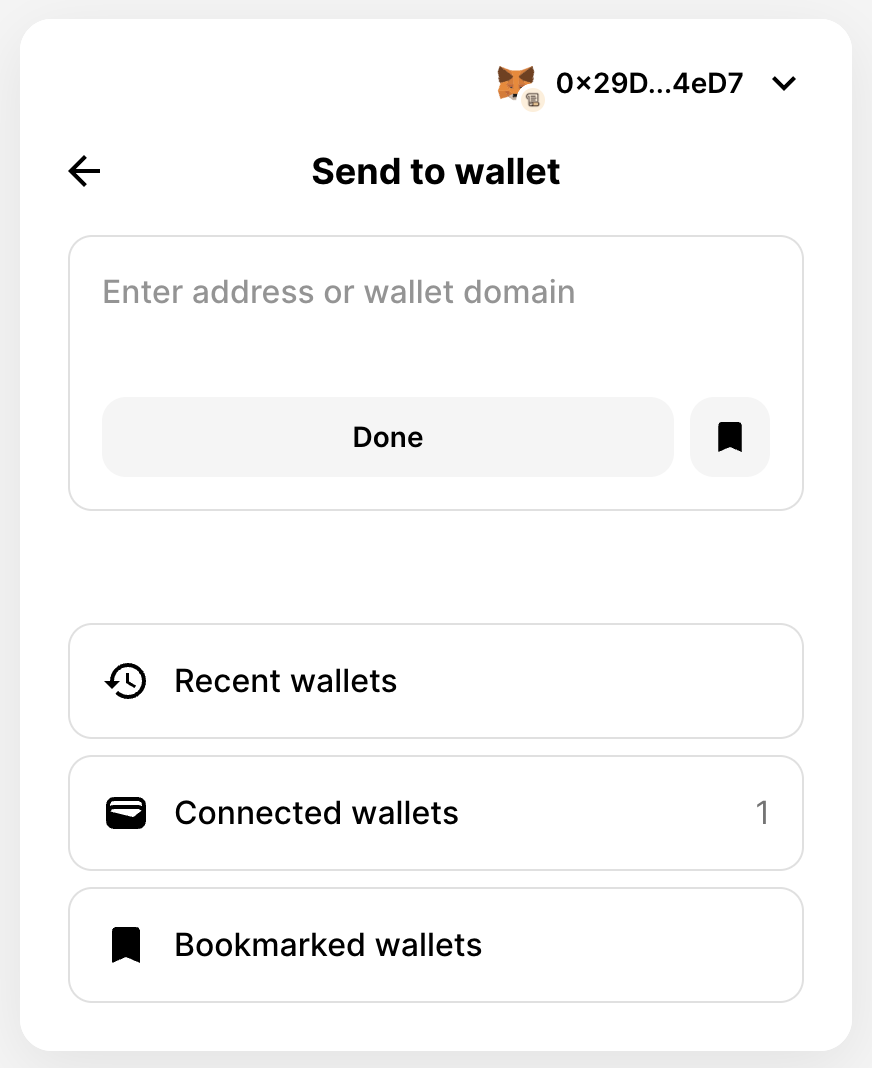
Send to wallet view
Configure single destination address
Developers can use thetoAddress option to configure a single destination address. The address and chainType properties are required, while the name and logoURI properties are optional.
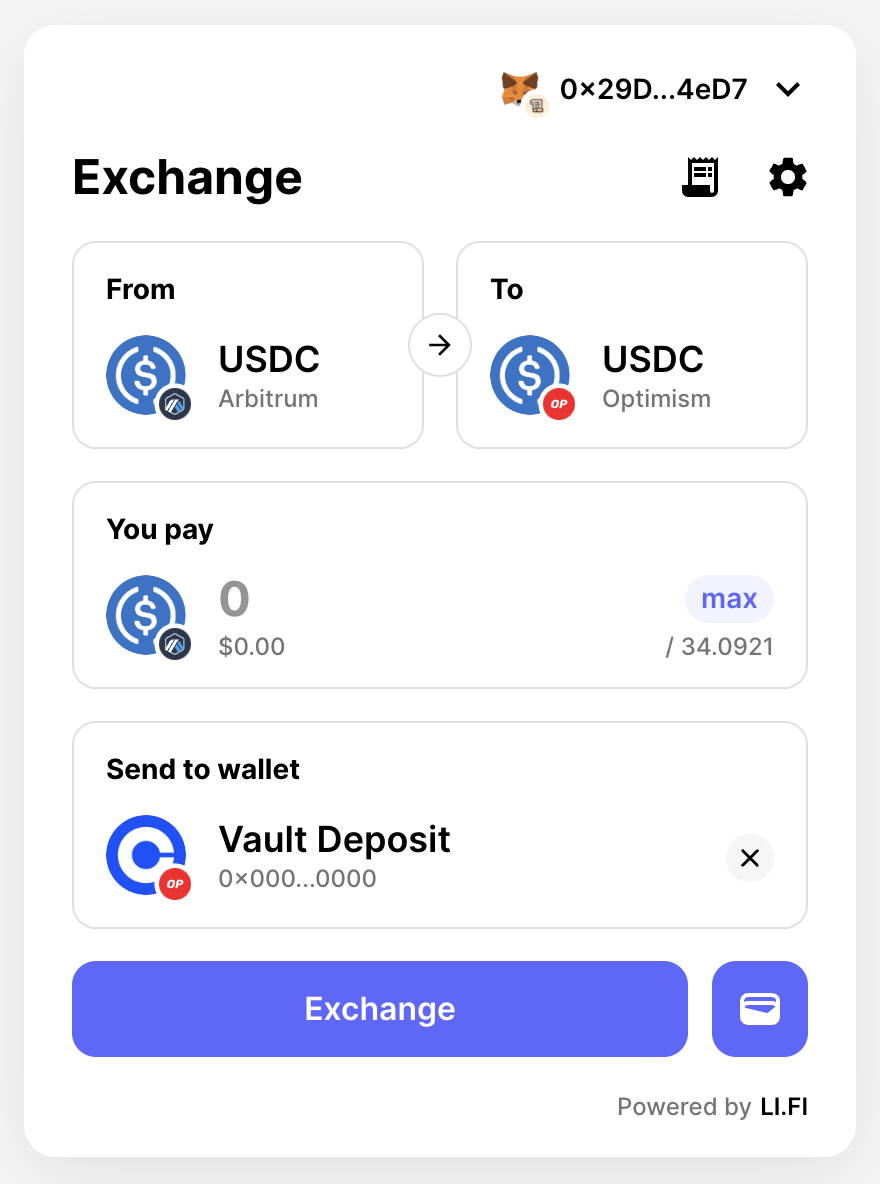
Configure a curated list of wallet addresses
Developers can usetoAddresses option to configure a curated list of wallet addresses.
Send to wallet button, they will open a pre-configured list of addresses from which to choose, skipping the step where they can manually enter the address.
Together with configuring the wallet list, developers can make the destination address required to be filled out. Please see Required destination address for more details.
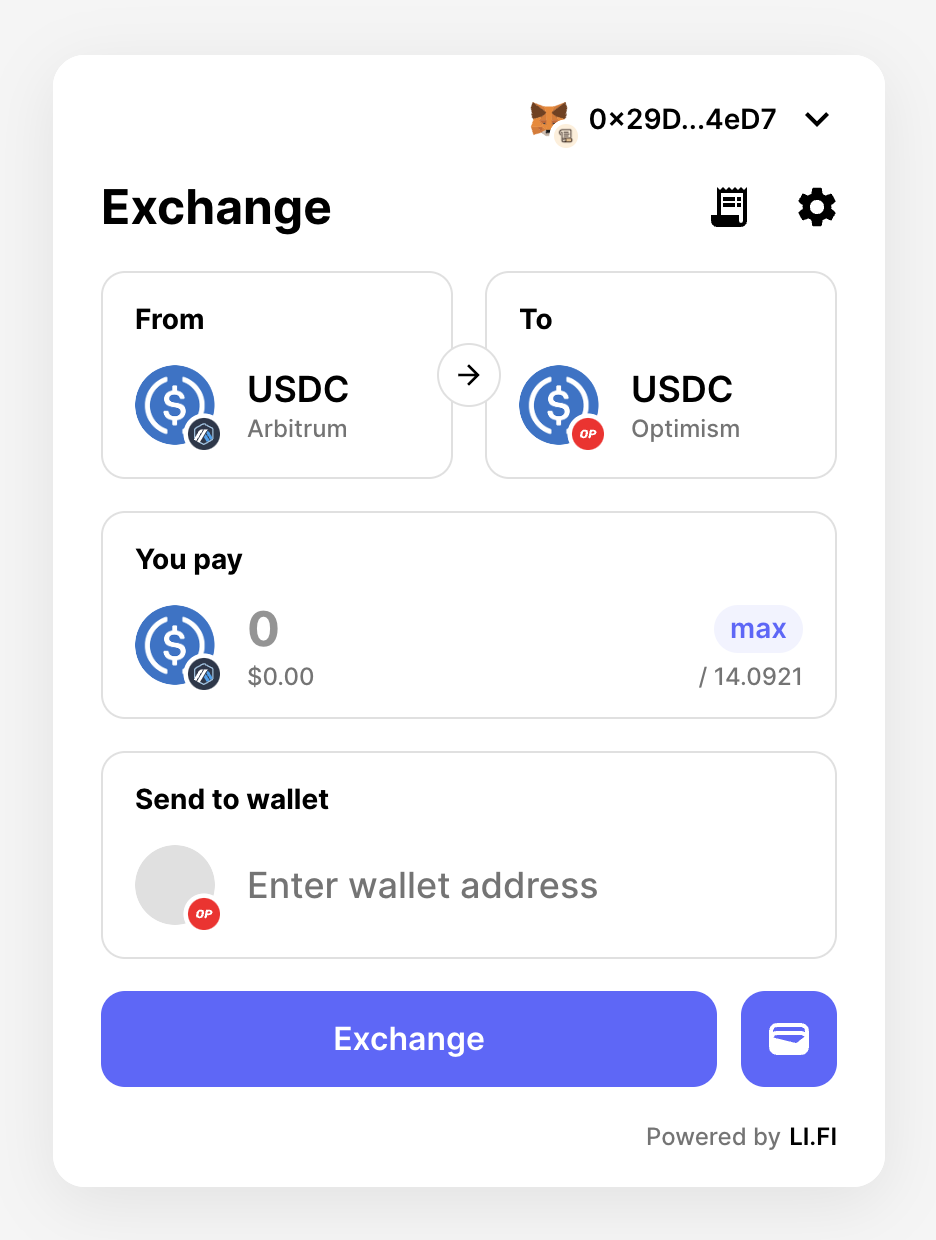
Optional destination address
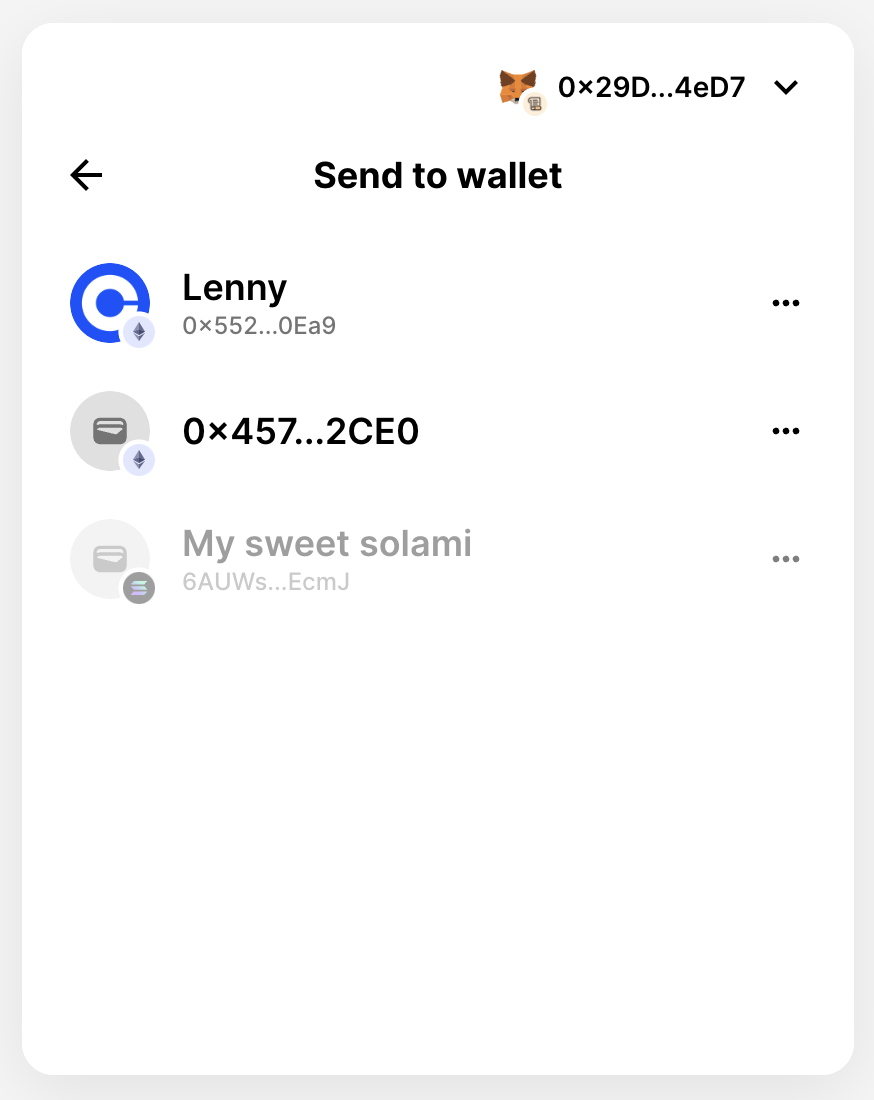
A curated list of wallet addresses
Explorer URLs
In the widget there are numerous points where a user can click to open an explorer in a separate browser tab in order to find out more information about a transaction or an address. Any buttons or links in the widget that present this icon will direct the user to an explorer. We have default behaviors in relation to opening explorers and we can also use widget config to override and change these behaviors.Default behavior for chains
Often when trying to direct a user to an explorer the widget will know which chain relates to a transaction or address and it will present an explorer that matches that chain. For example, after the user has executed a transaction, on the transaction details page they can click on the “Token allowance approved” explorer button to see more detail about that approval. If the approval was done using the Optimism chain then a new tab would open taking the user to optimistic.etherscan.io to show them more information about that approval. If no explorer can be found in relation to a chain then the user will be directed to LiFi’s explorer.Default behavior for internal explorers
An internal explorer is an explorer that is the preferred choice of an organization that is building an app using the widget. In some parts of the widget we use an internal explorer rather than attempting to find an explorer for a specific chain. For example, once the user has completed a transaction and is on the transaction details page they are presented with a transfer ID (see below). This is accompanied by a link which allows the user to open an explorer in order to find more information about that transaction. There is no attempt to find a chain specific explorer. The default explorer used is LI.FI own internal explorer and users will be directed to https://scan.li.fiOverriding the explorer URLs
It’s possible to override the explorer URLs that widget uses via the widget config. We can do this for specific chains and for the internal explorer. You can use your own explorer urls for multiple chains and at the same time state your own alternative for the internal explorer.Overriding explorers for a chain
In the widget config you can override chains by adding an entry to the explorerUrls object: you provide the chain id as a key and the base url of the explorer as the value.Custom explorer paths
For explorers that don’t follow the standard/address/:address and /tx/:hash convention, you can specify custom paths:
Overriding explorers for the internal explorer
In the widget config you can override the internal explorer by adding an entry to the explorerUrls object: you provideinternal as a key and the base url of the explorer as the value.
Address and transaction pages
The widget assumes that the explorer will provide pages for addresses at/address/:address and for transactions at /tx/:hash and will attempt to navigate the user to those pages when the users clicks the related buttons.
A link to a wallet address would look like:
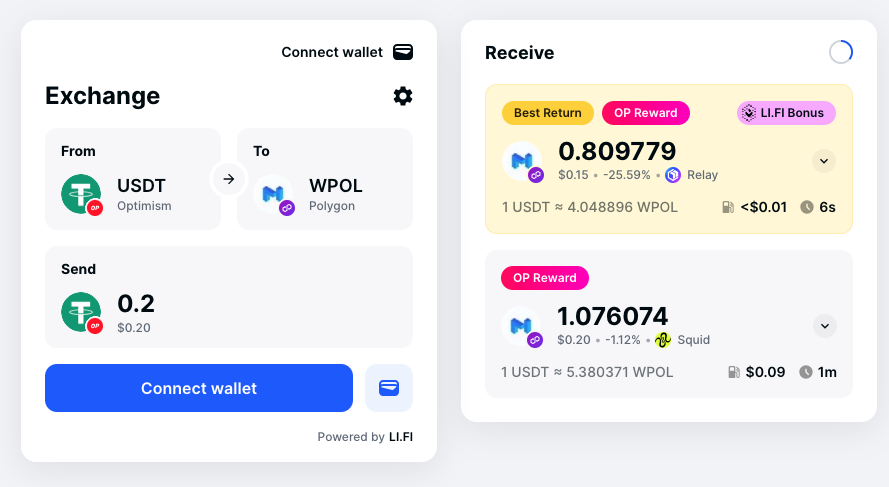
Adding route labels
The Widget allows you to visually enhance specific routes by adding route labels — styled badges with customizable text and appearance. To display route labels dynamically, configure therouteLabels: RouteLabelRule[] array in your WidgetConfig.
text and sx styling of the badge in the MUI-style CSS-in-JS way.
The rest of the fields determine when and where a label should be applied based on route conditions.
You can combine multiple criteria such as fromChainId, exchanges, tokens, and more.
For bridges and exchanges, use the allow and deny fields for fine-grained control, similarly to how it is described in Configure allow and deny options.
For matching logic that the built-in fields cannot express — gas costs, step count, route tags, or any other property on the Route object — provide a custom match predicate.
Its result is AND’d with the other criteria on the rule, so all specified conditions must pass for the label to apply.
A rule can also use match on its own without any other fields.
The
match predicate is not supported in @lifi/widget-light, since functions cannot be transferred across the iframe boundary via postMessage.