> ## Documentation Index
> Fetch the complete documentation index at: https://docs.li.fi/llms.txt
> Use this file to discover all available pages before exploring further.
# 配置组件
> 触手可及的灵活性
LI.FI 组件支持一系列配置选项,允许您:
* 允许或拒绝特定的链、代币、桥接器和交易所。
* 预设默认的源链和目标链。
* 为源链和目标链选择默认代币。
* 设置目标代币的数量。
* 指定目标地址。
* 通过 `sdkConfig` 配置自定义各种 LI.FI SDK 设置。
这些选项使您能够精确控制组件的行为,并通过根据特定需求和偏好进行调整来改善用户体验。
## LI.FI SDK 配置
LI.FI 组件构建在 LI.FI SDK 之上,利用其强大的跨链交换和桥接功能。sdkConfig 选项允许您直接在组件中配置 SDK 的各个方面。
让我们看看使用 sdkConfig 选项配置私有 RPC 端点的示例。
```typescript theme={"system"}
import { LiFiWidget, WidgetConfig, ChainId } from "@lifi/widget";
const widgetConfig: WidgetConfig = {
sdkConfig: {
rpcUrls: {
[ChainId.ARB]: ["https://arbitrum-example.node.com/"],
[ChainId.SOL]: ["https://solana-example.node.com/"],
},
},
};
export const WidgetPage = () => {
return (
);
};
```
In a production app, it is recommended to pass through your authenticated RPC provider URL (Alchemy, Infura, Ankr, etc).
If no RPC URLs are provided, LI.FI Widget will default to public RPC providers.
Public RPC endpoints (especially Solana) can sometimes rate-limit users depending on location or during periods of heavy load, leading to issues such as incorrectly displaying balances or errors with transaction simulation.
Please see other SDK configuration options 中 [配置 SDK](/sdk/configure-sdk) section.
## Initialize form values
The LI.FI Widget uses a number of form values that are used to fetch and execute routes.
These values are `fromAmount`, `fromChain`, `fromToken`, `toChain`, `toToken` and `toAddress`.
They are most often set by using the Widget UI but they can also be initialized and updated programmatically.
By configuring these options, you can streamline the user experience, ensuring that the widget is preloaded with the desired chains, tokens, amount and address for a swap or bridge. This reduces the need for manual input and helps guide users through the intended flow.
You can initialize these values by either:
* Widget config - by adding `fromAmount`, `fromChain`, `fromToken`, `toChain`, `toToken` or `toAddress` values to the widget config.
* URL search params - when `buildUrl` 中 widget config is set to `true`, by adding them to the URL search params 中 url of the page the widget is featured on.
When setting form values via config or URL search params you will see any corresponding form field UI updated to reflect those values.
## Initializing by widget config
The LI.FI Widget allows you to preconfigure default chains and tokens, making it easy to set up your desired swap or bridging parameters right from the start. Below is an example of how to configure the widget with specific default chains, tokens, amount, and send to address values.
```typescript theme={"system"}
import type { WidgetConfig } from "@lifi/widget";
import { ChainType } from "@lifi/widget";
const widgetConfig: WidgetConfig = {
// set source chain to Polygon
fromChain: 137,
// set destination chain to Optimism
toChain: 10,
// set source token to USDC (Polygon)
fromToken: "0x3c499c542cEF5E3811e1192ce70d8cC03d5c3359",
// set source token to USDC (Optimism)
toToken: "0x0b2C639c533813f4Aa9D7837CAf62653d097Ff85",
// set source token amount to 10 USDC (Polygon)
fromAmount: 10,
// set the destination wallet address
toAddress: {
address: "0x29DaCdF7cCaDf4eE67c923b4C22255A4B2494eD7",
chainType: ChainType.EVM,
},
};
export const WidgetPage = () => {
return (
);
};
```
You can also set a minimum amount in USD equivalent using the `minFromAmountUSD` parameter (number) to ensure users meet minimum transaction requirements.
## Initializing by URL search params
To initialize form values 中 widget using URL search params you will need to ensure that `buildUrl` is set to `true` 中 widget config.
```typescript theme={"system"}
import type { WidgetConfig } from "@lifi/widget";
const widgetConfig: WidgetConfig = {
// instruct the widget to use and build url search params
buildUrl: true,
};
```
You can then feature the URL search params 中 URL when navigating to the page that features the widget.
```typescript theme={"system"}
https://playground.li.fi/?fromAmount=20&fromChain=42161&fromToken=0xFd086bC7CD5C481DCC9C85ebE478A1C0b69FCbb9&toAddress=0x29DaCdF7cCaDf4eE67c923b4C22255A4B2494eD7&toChain=42161&toToken=0xaf88d065e77c8cC2239327C5EDb3A432268e5831
```
Its important to understand this will only work for the widgets initialization - dynamically changing the search params 中 URL without a page load will not cause an update of the form values 中 widget.
Config values override URL search params
If you want to use URL search params to populate the widget’s form values on initialization (or page load) its important that those form values are NOT featured 中 config object used to initialize the widget. fromAmount, fromChain, fromToken, toAddress, toChain, and toToken should NOT be set on the widget config in order to allow the URL to perform the initial set up of the widgets state.
On first page load if you have form values in both the config and the URL then the URL search params will be rewritten to match the config values and the widget form will be populated with the values presented 中 config.
## Update form values
After the widget has initialized there are two ways you can update the form values 中 widget
* Using the widget config - this uses reactive values 中 config and requires some management of those values for updates
* Using the formRef - this provides an function call that you can use to update values 中 widgets form store.
Note that when `buildUrl` is set to `true` 中 widget config both methods
should also update the URL search params as well as the value displayed 中
widget itself.
## Updating by widget config
Once the widget has initialized you can update the form values 中 widget by updating the widget config.
To perform an update you should only include the form values 中 config that you want to change and ensure these changes are passed to the Widget.
For example, if you want to change the fromChain and fromToken and nothing else you should include only include those values
In addition to the form values you want to change you should also set a formUpdateKey. This needs to be a unique, randomly generated string and is used to ensure that the form values are updated 中 widget - essentially forcing an update. This can avoid some edge case issues that might arise when setting values 中 widget via a mix of config and user actions via the widgets UI.
Here is an example of what your config would look like.
```typescript theme={"system"}
import type { WidgetConfig } from '@lifi/widget';
const widgetConfig: WidgetConfig = {
fromChain: 10,
fromToken: ‘0x94b008aA00579c1307B0EF2c499aD98a8ce58e58’,
// use the date object to generate a unique value
formUpdateKey: new Date().valueOf().toString()
// config may still feature other config values but
// should not include other form values…
}
```
You can also reset the form values and their fields to an empty state using `undefined`. This example resets only the fromChain and fromToken form values.
```typescript theme={"system"}
import type { WidgetConfig } from "@lifi/widget";
const widgetConfig: WidgetConfig = {
fromChain: undefined,
fromToken: undefined,
// use the date object to generate a unique value
formUpdateKey: new Date().valueOf().toString(),
// config may still feature other config values but
// should not include other form values…
};
```
Here `undefined` used to reset a the widgets form value to an empty state. The absence of a property from the widget config object means that property will remain unchanged.
State management with widget config
When using config to update widgets form values it is often a good choice to consider using an application state management library to store your widget config. There are many options to choose from such as Zustand, MobX, Redux or even React context.
For example, if you were to use Zustand as your state management tool you could use Zustand’s API to access and set values on your config from any part of your application. In addition you would also be able to use Zustand’s equality functionality, such as the built-in `shallow` function, to ensure that your widget config is only used to update the instance of the LiFi Widget when necessary. This should be beneficial for optimizing re-renders.
You can find an example that uses [Zustand to manage widget config](https://github.com/lifinance/widget/tree/main/examples/zustand-widget-config) 中 widget repository.
## Updating by form ref
This method provides developers a way to set the form values directly 中 widget without making changes to the widget config. By passing a ref object to the widget you can access a function to set values directly on the widgets form state. See the example below.
```typescript theme={"system"}
import type { FormState } from '@lifi/widget';
import { LiFiWidget } from '@lifi/widget';
export const WidgetPage = () => {
const widgetConfig: WidgetConfig = {
buildUrl: true,
};
const formRef = useRef(null);
const handleClick = () => {
formRef.current?.setFieldValue( ‘fromChain’, 10, { setUrlSearchParam: true });
};
return (
<>
)
}
```
Notice the use of `setFieldValue` function.
```typescript theme={"system"}
formRef.current?.setFieldValue( ‘fromChain’, 10, { setUrlSearchParam: true });
```
Once initialized the `setFieldValue` function can be called to set the form value, note that `setUrlSearchParam` will ensure the url is updated if you have `buildUrl` set to `true` in your widget config.
Here are some examples of usage.
```typescript fromChain & fromToken theme={"system"}
// fromChain and fromToken can be set independently but you might also find that you want to set them at the same time
formRef.current?.setFieldValue(
'fromChain',
10,
{ setUrlSearchParam: true }
);
formRef.current?.setFieldValue(
'fromToken',
'0x94b008aA00579c1307B0EF2c499aD98a8ce58e58',
{ setUrlSearchParam: true }
);
// To reset fromChain and fromToken
formRef.current?.setFieldValue(
'fromChain',
undefined,
{ setUrlSearchParam: true }
);
formRef.current?.setFieldValue(
'fromToken',
undefined
{ setUrlSearchParam: true }
);
```
```typescript fromAmount theme={"system"}
formRef.current?.setFieldValue(
'fromAmount',
'10',
{ setUrlSearchParam: true }
);
// To reset fromAmount
formRef.current?.setFieldValue(
'fromAmount',
undefined
{ setUrlSearchParam: true }
);
```
```typescript toAddress theme={"system"}
import { ChainType } from '@lifi/widget';
formRef.current?.setFieldValue(
'toAddress',
{
name: 'Lenny',
address: '0x552008c0f6870c2f77e5cC1d2eb9bdff03e30Ea9',
chainType: ChainType.EVM,
},
{ setUrlSearchParam: true }
);
// To reset toAddress
formRef.current?.setFieldValue(
'toAddress',
undefined
{ setUrlSearchParam: true }
);
```
## Configure allow and deny options
We provide `allow` and `deny` configuration options to control which chains, tokens, bridges, and exchanges can be used within your application. Here’s how you can set up and use these options:
```typescript theme={"system"}
import { LiFiWidget, WidgetConfig } from "@lifi/widget";
const widgetConfig: WidgetConfig = {
// disable BSC from being shown in the chains list
chains: {
deny: [56],
},
// allow bridging through Stargate bridge only
bridges: {
allow: ["stargateV2"],
},
};
export const WidgetPage = () => {
return (
);
};
```
To control which tokens appear 中 **from** and **to** lists, use the `allow` and `deny` options:
* If defined at the top level of the `tokens` object, they apply to **both** lists.
* If defined inside the `from` or `to` objects, they apply **only** to that specific list.
* If an `allow` list is defined, only tokens included in it are allowed. If no `allow` list is defined, all tokens are allowed unless they are explicitly included in `deny`. If a token appears in both `allow` and `deny`, the `allow` list takes precedence.
* A token must pass both the top level `allow`/`deny` check and the check for the current list (`from` or `to`) to be considered allowed.
* Token filters are applied per chain. When tokens are allowed/denied for a specific chain, only that chain's tokens are affected. Other chains remain unfiltered and show all their available tokens.
```typescript theme={"system"}
import { LiFiWidget, WidgetConfig } from "@lifi/widget";
const widgetConfig: WidgetConfig = {
tokens: {
// Top-level allow/deny apply to BOTH 'from' and 'to' lists
allow: [
{
address: "0x0000000000000000000000000000000000000000",
chainId: 1,
},
],
deny: [
{
address: "0x0000000000000000000000000000000000000000",
chainId: 137,
},
],
// 'from' list-specific allow/deny complements top-level settings
from: {
allow: [
{
address: "0xC02aaA39b223FE8D0A0e5C4F27eAD9083C756Cc2",
chainId: 1,
},
],
deny: [
{
address: "0x0000000000000000000000000000000000000000",
chainId: 1,
},
],
},
// 'to' list-specific allow/deny
to: {
allow: [
{
address: "0x0000000000000000000000000000000000000000",
chainId: 137,
},
],
deny: [
{
address: "0xC02aaA39b223FE8D0A0e5C4F27eAD9083C756Cc2",
chainId: 1,
},
],
},
},
};
export const WidgetPage = () => {
return (
);
};
```
Apart from the `allow` and `deny` options, the `tokens` option can be configured to include other tokens or featured tokens that will appear at the top of the corresponding list of tokens.
```typescript theme={"system"}
import { LiFiWidget, WidgetConfig } from "@lifi/widget";
const widgetConfig: WidgetConfig = {
tokens: {
// Featured tokens will appear on top of the list
featured: [
{
address: "0x2fd6c9b869dea106730269e13113361b684f843a",
symbol: "CHH",
decimals: 9,
chainId: 56,
name: "Chihuahua",
logoURI:
"https://s2.coinmarketcap.com/static/img/coins/64x64/21334.png",
},
],
// Include any token to the list
include: [
{
address: "0xba98c0fbebc892f5b07a42b0febd606913ebc981",
symbol: "MEH",
decimals: 18,
chainId: 1,
name: "meh",
logoURI:
"https://s2.coinmarketcap.com/static/img/coins/64x64/22158.png",
},
],
},
};
export const WidgetPage = () => {
return (
);
};
```
## Destination address
There are use cases where users need to have a different destination address. Usually, they can enter the destination address independently.
Still, the widget also has configuration options to pre-configure the destination address or create a curated list of wallet addresses to choose from.
## Configure single destination address
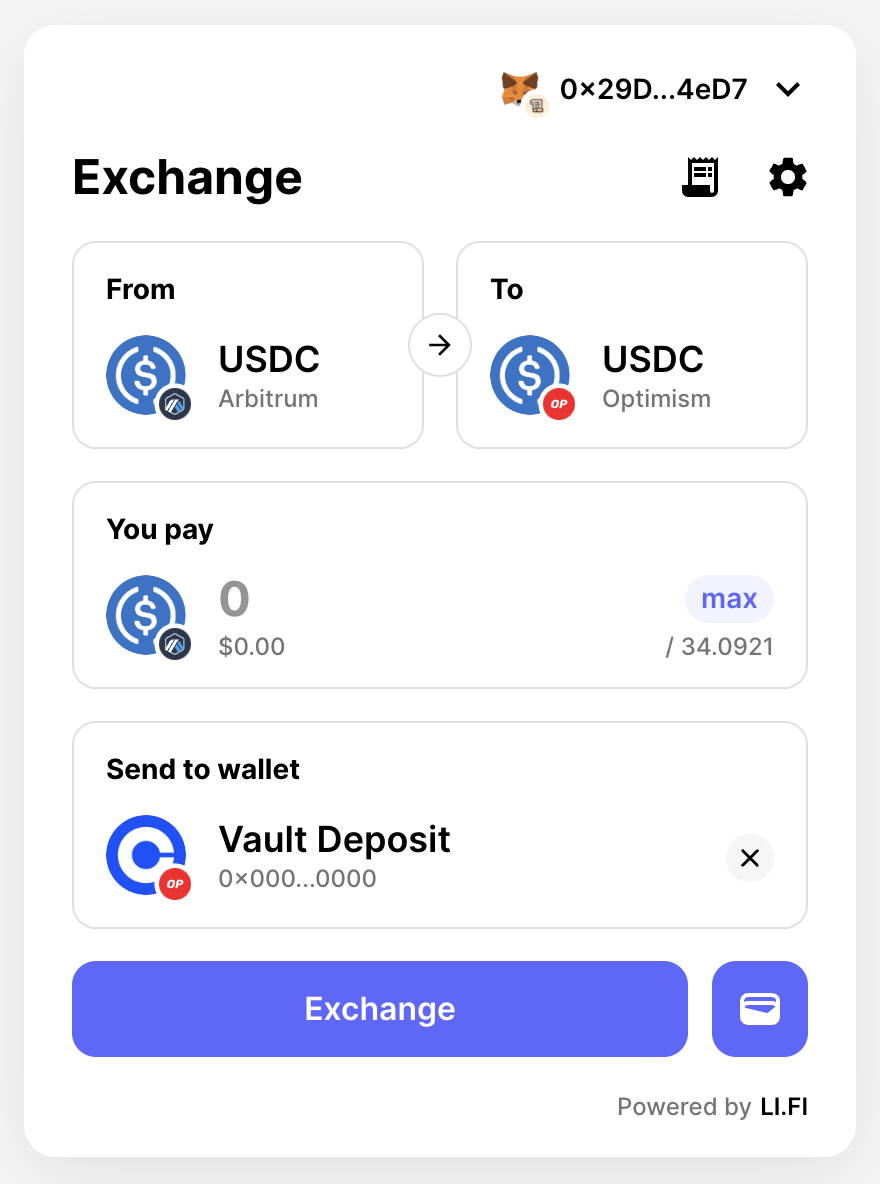
Developers can use the `toAddress` option to configure a single destination address. The `address` and `chainType` properties are required, while the `name` and `logoURI` properties are optional.
```typescript theme={"system"}
import { ChainType, LiFiWidget, WidgetConfig } from "@lifi/widget";
const widgetConfig: WidgetConfig = {
toAddress: {
name: "Vault Deposit",
address: "0x0000000000000000000000000000000000000000",
chainType: ChainType.EVM,
logoURI: "https://example.com/image.svg",
},
};
export const WidgetPage = () => {
return (
);
};
```
## Configure a curated list of wallet addresses
Developers can use `toAddresses` option to configure a curated list of wallet addresses.
```typescript theme={"system"}
import { ChainType, LiFiWidget, WidgetConfig } from "@lifi/widget";
const widgetConfig: WidgetConfig = {
toAddresses: [
{
name: "Lenny",
address: "0x552008c0f6870c2f77e5cC1d2eb9bdff03e30Ea9",
chainType: ChainType.EVM,
logoURI: "https://example.com/image.svg",
},
{
address: "0x4577a46A3eCf44E0ed44410B7793977ffbe22CE0",
chainType: ChainType.EVM,
},
{
name: "My sweet solami",
address: "6AUWsSCRFSCbrHKH9s84wfzJXtD6mNzAHs11x6pGEcmJ",
chainType: ChainType.SVM,
},
],
};
export const WidgetPage = () => {
return (
);
};
```
Using this configuration, when users click on the `Send to wallet` button, they will open a pre-configured list of addresses from which to choose, skipping the step where they can manually enter the address.
Together with configuring the wallet list, developers can make the destination address required to be filled out. Please see Required destination address for more details.
## Explorer URLs
In the widget there are numerous points where a user can click to open an explorer in a separate browser tab in order to find out more information about a transaction or an address. Any buttons or links 中 widget that present this icon will direct the user to an explorer.
We have default behaviors in relation to opening explorers and we can also use widget config to override and change these behaviors.
## Default behavior for chains
Often when trying to direct a user to an explorer the widget will know which chain relates to a transaction or address and it will present an explorer that matches that chain.
For example, after the user has executed a transaction, on the transaction details page they can click on the "Token allowance approved" explorer button to see more detail about that approval. If the approval was done using the Optimism cha中n a new tab would open taking the user to optimistic.etherscan.io to show them more information about that approval.
If no explorer can be found in relation to a cha中n the user will be directed to LiFi’s explorer.
## Default behavior for internal explorers
An internal explorer is an explorer that is the preferred choice of an organization that is building an app using the widget. In some parts of the widget we use an internal explorer rather than attempting to find an explorer for a specific chain.
For example, once the user has completed a transaction and is on the transaction details page they are presented with a transfer ID (see below). This is accompanied by a link which allows the user to open an explorer in order to find more information about that transaction. There is no attempt to find a chain specific explorer. The default explorer used is LI.FI own internal explorer and users will be directed to [https://scan.li.fi](https://scan.li.fi/)
## Overriding the explorer URLs
It's possible to override the explorer URLs that widget uses via the widget config. We can do this for specific chains and for the internal explorer. You can use your own explorer urls for multiple chains and at the same time state your own alternative for the internal explorer.
### Overriding explorers for a chain
In the widget config you can override chains by adding an entry to the explorerUrls object: you provide the chain id as a key and the base url of the explorer as the value.
```typescript theme={"system"}
import type { WidgetConfig } from "@lifi/widget";
const widgetConfig: WidgetConfig = {
explorerUrls: {
42161: ["https://scan.li.fi"],
},
};
```
The explorer specified above will be used only for that chain, 中 above example this would be Arbitrum. For other chains that aren’t specified 中 explorerUrls object the widget will still present the default behavior (as stated above).
### Overriding explorers for the internal explorer
In the widget config you can override the internal explorer by adding an entry to the explorerUrls object: you provide `internal` as a key and the base url of the explorer as the value.
```typescript theme={"system"}
import type { WidgetConfig } from "@lifi/widget";
const widgetConfig: WidgetConfig = {
explorerUrls: {
internal: ["https://jumper.exchange/scan"],
},
};
```
Any places with中 widget that use the internal explorer will now use the url stated 中 config rather than the default.
## Address and transaction pages
The widget assumes that the explorer will provide pages for addresses at `/address/:address` and for transactions at `/tx/:hash` and will attempt to navigate the user to those pages when the users clicks the related buttons.
A link to a wallet address would look like:
```typescript theme={"system"}
https://scan.li.fi/address/0xb9c0dE368BECE5e76B52545a8E377a4C118f597B
```
And a link to a transaction would look like:
```typescript theme={"system"}
https://scan.li.fi/tx/0x05dbd8d3be79ad466e7d2898f719cc47b1b3b545cf4782aece16e11849ddd24b
```
The widget assumes that any explorer used with the widget will follow this convention.
## Adding route labels
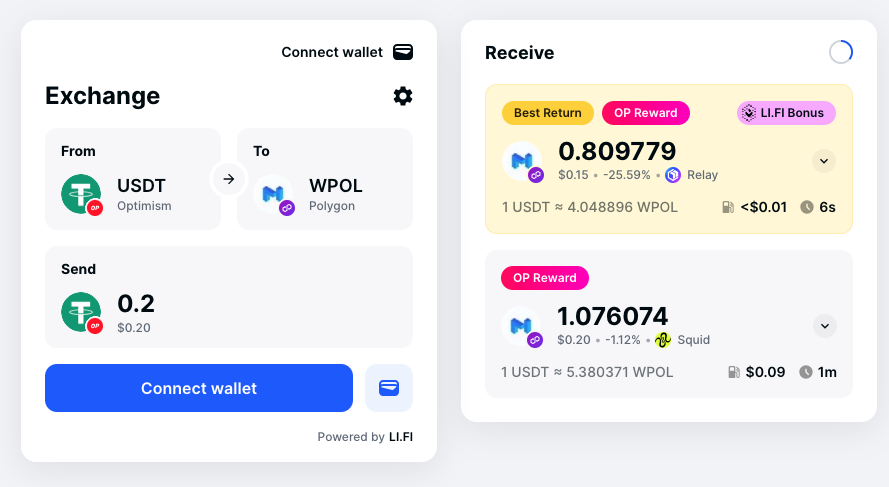
The Widget allows you to visually enhance specific routes by adding route labels — styled badges with customizable text and appearance.
To display route labels dynamically, configure the `routeLabels: RouteLabelRule[]` array in your `WidgetConfig`.
```typescript theme={"system"}
interface RouteLabelRule {
label: RouteLabel; // The label to display if conditions match
bridges?: AllowDeny; // Optional: Filter by bridge(s)
exchanges?: AllowDeny; // Optional: Filter by exchange(s)
fromChainId?: number[]; // Optional: Filter by source chain ID(s)
toChainId?: number[]; // Optional: Filter by destination chain ID(s)
fromTokenAddress?: string[]; // Optional: Filter by source token address(es)
toTokenAddress?: string[]; // Optional: Filter by destination token address(es)
}
interface RouteLabel {
text: string; // Text to show on the label
sx?: SxProps; // Optional: Style object (MUI-style)
}
```
Each label rule defines matching conditions and a label configuration that will be applied if the conditions are met.
The label configuration includes `text` and `sx` styling of the badge 中 MUI-style CSS-in-JS way.
The rest of the fields determine when and where a label should be applied based on route conditions.
You can combine multiple criteria such as `fromChainId`, `exchanges`, `tokens`, and more.
For bridges and exchanges, use the `allow` and `deny` fields for fine-grained control, similarly to how it is described in [Configure allow and deny options](#configure-allow-and-deny-options).
Example configuration:
```typescript theme={"system"}
import { ChainId } from "@lifi/sdk";
import type { WidgetConfig } from "@lifi/widget";
const widgetConfig: WidgetConfig = {
routeLabels: [
{
label: {
text: "OP Reward",
sx: {
background: "linear-gradient(90deg, #ff0404, #ff04c8)",
"@keyframes gradient": {
"0%": { backgroundPosition: "0% 50%" },
"50%": { backgroundPosition: "100% 50%" },
"100%": { backgroundPosition: "0% 50%" },
},
animation: "gradient 3s ease infinite",
backgroundSize: "200% 200%",
color: "#ffffff",
},
},
fromChainId: [ChainId.OPT], // Applies to routes from Optimism
},
{
label: {
text: "LI.FI Bonus",
sx: {
display: "flex",
alignItems: "center",
position: "relative",
overflow: "hidden",
marginLeft: "auto",
order: 1,
backgroundImage:
"url(https://raw.githubusercontent.com/lifinance/types/main/src/assets/icons/exchanges/lifidexaggregator.svg)",
backgroundPosition: "left center",
backgroundRepeat: "no-repeat",
backgroundSize: "24px",
paddingLeft: "12px",
backgroundColor: "#f5b5ff",
},
},
fromChainId: [ChainId.OPT], // Applies to routes from Optimism
exchanges: {
allow: ["relay"], // Only show for Relay routes
},
},
],
};
```
Rendered example of the configured route labels:
Labels only appear when *all* specified criteria are satisfied by a route.
 ## Configure a curated list of wallet addresses
Developers can use `toAddresses` option to configure a curated list of wallet addresses.
```typescript theme={"system"}
import { ChainType, LiFiWidget, WidgetConfig } from "@lifi/widget";
const widgetConfig: WidgetConfig = {
toAddresses: [
{
name: "Lenny",
address: "0x552008c0f6870c2f77e5cC1d2eb9bdff03e30Ea9",
chainType: ChainType.EVM,
logoURI: "https://example.com/image.svg",
},
{
address: "0x4577a46A3eCf44E0ed44410B7793977ffbe22CE0",
chainType: ChainType.EVM,
},
{
name: "My sweet solami",
address: "6AUWsSCRFSCbrHKH9s84wfzJXtD6mNzAHs11x6pGEcmJ",
chainType: ChainType.SVM,
},
],
};
export const WidgetPage = () => {
return (
## Configure a curated list of wallet addresses
Developers can use `toAddresses` option to configure a curated list of wallet addresses.
```typescript theme={"system"}
import { ChainType, LiFiWidget, WidgetConfig } from "@lifi/widget";
const widgetConfig: WidgetConfig = {
toAddresses: [
{
name: "Lenny",
address: "0x552008c0f6870c2f77e5cC1d2eb9bdff03e30Ea9",
chainType: ChainType.EVM,
logoURI: "https://example.com/image.svg",
},
{
address: "0x4577a46A3eCf44E0ed44410B7793977ffbe22CE0",
chainType: ChainType.EVM,
},
{
name: "My sweet solami",
address: "6AUWsSCRFSCbrHKH9s84wfzJXtD6mNzAHs11x6pGEcmJ",
chainType: ChainType.SVM,
},
],
};
export const WidgetPage = () => {
return (
 Labels only appear when *all* specified criteria are satisfied by a route.