> ## Documentation Index
> Fetch the complete documentation index at: https://docs.li.fi/llms.txt
> Use this file to discover all available pages before exploring further.
# 钱包管理
> 为无缝钱包管理配置您的组件
组件具有内置的钱包管理 UI,因此您可以连接钱包并将组件作为独立的 dApp 开箱即用。但是,当将组件嵌入到 dApp 中时,重用该 dApp 的现有钱包管理 UI 最有意义。
组件支持多个生态系统和类型的链(EVM、SVM、UTXO),因此使用多个不同的库来管理与这些链的钱包连接。
## EVM 钱包连接
为了管理与 EVM(以太坊虚拟机)链的钱包连接、切换链等,组件内部使用 [Wagmi](https://wagmi.sh/) 库,并为所有基于 Wagmi 的库(如 [RainbowKit](https://www.rainbowkit.com/)、[Dynamic](https://github.com/lifinance/widget/tree/main/examples/dynamic)、[Reown AppKit](https://docs.reown.com/appkit/overview))提供一流支持。
如果您已经在 dApp 中使用 Wagmi 或基于 Wagmi 的库管理钱包,并且组件检测到它被包装在 [WagmiProvider](https://wagmi.sh/react/api/WagmiProvider) 中,它将开始重用您的钱包管理,无需任何额外配置。
下面的示例显示了如何使用 Wagmi 预配置基本钱包管理。
```typescript theme={"system"}
import { LiFiWidget } from "@lifi/widget";
import { createClient } from "viem";
import { WagmiProvider, createConfig, http } from "wagmi";
import { mainnet, arbitrum, optimism, scroll } from "wagmi/chains";
import { injected } from "wagmi/connectors";
const wagmiConfig = createConfig({
// Make sure to provide the full list of chains
// you would like to support in the Widget
// and keep them in sync, so all functionality
// like switching chains can work correctly.
chains: [mainnet, arbitrum, optimism, scroll],
connectors: [injected()],
client({ chain }) {
return createClient({ chain, transport: http() });
},
});
export const WidgetPage = () => {
return (
);
};
```
### Keep chains in sync
It is important to keep the Wagmi chains configuration in sync with the Widget chain list so all functionality, like switching chains, can keep working correctly.
There are two approaches to this:
1. Manually update the Widget and Wagmi chains configuration to specify all chains you would like to support in your dApp and the Widget. See [配置组件](https://docs.li.fi/integrate-li.fi-widget/configure-widget) page to know more about the Widget's allow/deny chains configuration.
2. Get all available chains from LI.FI API and dynamically update Wagmi configuration. The Widget provides hooks to ease this approach.
Here is an example of how to support all available LI.FI chains dynamically using Wagmi and additional hooks from `@lifi/widget` package.
```typescript WalletProvider.tsx theme={"system"}
import { useSyncWagmiConfig } from '@lifi/wallet-management';
import { useAvailableChains } from '@lifi/widget';
import { injected } from '@wagmi/connectors';
import { useRef, type FC, type PropsWithChildren } from 'react';
import { createClient, http } from 'viem';
import { mainnet } from 'viem/chains';
import type { Config } from 'wagmi';
import { createConfig, WagmiProvider } from 'wagmi';
const connectors = [injected()];
export const WalletProvider: FC = ({ children }) => {
const { chains } = useAvailableChains();
const wagmi = useRef();
if (!wagmi.current) {
wagmi.current = createConfig({
chains: [mainnet],
client({ chain }) {
return createClient({ chain, transport: http() });
},
ssr: true,
});
}
useSyncWagmiConfig(wagmi.current, connectors, chains);
return (
{children}
); };
```
```typescript WidgetPage.tsx theme={"system"}
import { LiFiWidget } from '@lifi/widget';
import { WalletProvider } from '../providers/WalletProvider';
export const WidgetPage = () => {
return (
);
};
```
Please check out our complete examples 中 widget repository [here](https://github.com/lifinance/widget/tree/main/examples).
### Support for Ethers.js and other alternatives
Developers can still use Ethers.js or any other alternative library 中ir project and convert `Signer`/`Provider` objects to Wagmi's [injected](https://wagmi.sh/react/api/connectors/injected) connector before wrapping the Widget with [WagmiProvider](https://wagmi.sh/react/api/WagmiProvider).
## SVM wallet connection
To manage wallet connections to SVM (Solana Virtual Machine) chains the widget uses the [Solana Wallet Standard](https://github.com/anza-xyz/wallet-standard) library.
If you already manage wallets using Solana Wallet Standard library in your dApp and the Widget detects that it is wrapped in [ConnectionProvider](https://solana.com/developers/cookbook/wallets/connect-wallet-react) and [WalletProvider](https://solana.com/developers/cookbook/wallets/connect-wallet-react) it will start re-using your wallet management without any additional configuration.
The example below shows how to preconfigure a basic wallet management for SVM.
```typescript SolanaWalletProvider.tsx theme={"system"}
import type { Adapter } from "@solana/wallet-adapter-base";
import { WalletAdapterNetwork } from "@solana/wallet-adapter-base";
import {
ConnectionProvider,
WalletProvider,
} from "@solana/wallet-adapter-react";
import { clusterApiUrl } from "@solana/web3.js";
import type { FC, PropsWithChildren } from "react";
const endpoint = clusterApiUrl(WalletAdapterNetwork.Mainnet);
/**
* Wallets that implement either of these standards will be available automatically.
*
* - Solana Mobile Stack Mobile Wallet Adapter Protocol
* (https://github.com/solana-mobile/mobile-wallet-adapter)
* - Solana Wallet Standard
* (https://github.com/solana-labs/wallet-standard)
*
* If you wish to support a wallet that supports neither of those standards,
* instantiate its legacy wallet adapter here. Common legacy adapters can be found
* in the npm package `@solana/wallet-adapter-wallets`.
*/
const wallets: Adapter[] = [];
export const SolanaWalletProvider: FC = ({ children }) => {
return (
{children}
);
};
```
```typescript WidgetPage.tsx theme={"system"}
import { LiFiWidget } from "@lifi/widget";
import { WalletProvider } from "../providers/SolanaWalletProvider";
export const WidgetPage = () => {
return (
);
};
```
## MVM wallet connection
To manage wallet connections to MVM (Move Virtual Machine) chains like SUI, the widget uses the [@mysten/dapp-kit](https://sdk.mystenlabs.com/dapp-kit) for wallet management and [@mysten/sui](https://sdk.mystenlabs.com/typescript) for SUI blockchain interactions.
If you already manage wallets using [@mysten/dapp-kit](https://sdk.mystenlabs.com/dapp-kit) in your dApp and the Widget detects that it is wrapped in [SuiClientProvider](https://sdk.mystenlabs.com/dapp-kit) and [WalletProvider](https://sdk.mystenlabs.com/dapp-kit), it will start re-using your wallet management without any additional configuration.
The example below shows how to preconfigure a basic wallet management for MVM chains.
```typescript SuiWalletProvider.tsx theme={"system"}
import type { FC, PropsWithChildren } from "react";
import {
createNetworkConfig,
SuiClientProvider,
WalletProvider,
} from "@mysten/dapp-kit";
import { getFullnodeUrl } from "@mysten/sui/client";
const { networkConfig } = createNetworkConfig({
mainnet: { url: getFullnodeUrl("mainnet") },
});
export const SuiWalletProvider: FC = ({ children }) => {
return (
{children}
);
};
```
```typescript WidgetPage.tsx theme={"system"}
import { LiFiWidget } from "@lifi/widget";
import { QueryClient, QueryClientProvider } from "@tanstack/react-query";
import { SuiWalletProvider } from "../providers/SuiWalletProvider";
const queryClient = new QueryClient();
export const WidgetPage = () => {
return (
);
};
```
## UTXO(Bitcoin) wallet connection
To manage wallet connections and chain interactions with UTXO chains like Bitcoin, the widget uses the [Bigmi](https://github.com/lifinance/bigmi) library.
If you already manage wallets using [Bigmi](https://github.com/lifinance/bigmi) in your dApp and the widget detects that it is wrapped in [BigmiProvider](https://github.com/lifinance/bigmi/blob/main/docs/react/index.md#provider), it will start re-using your wallet management without any additional configuration.
The example below shows how to preconfigure a basic wallet management for Bitcoin.
```typescript WidgetPage.tsx theme={"system"}
import type { Config, CreateConnectorFn } from '@bigmi/client'
import {
createConfig,
phantom,
unisat,
xverse,
} from '@bigmi/client'
import { bitcoin, createClient, http } from '@bigmi/core'
import { BigmiProvider } from '@bigmi/react'
const connectors: CreateConnectorFn[] = [phantom(), unisat(), xverse()]
const config = createConfig({
chains: [bitcoin],
connectors,
client({ chain }) {
return createClient({ chain, transport: http() })
}
}) as Config
export const WidgetPage: FC = ({ children }) => {
return (
);
};
```
## Configuration
There are additional configurations to smooth integration for external wallet management or in case of internal one provide options for WalletConnect and Coinbase Wallet.
```typescript theme={"system"}
interface WidgetWalletConfig {
onConnect(): void;
walletConnect?: WalletConnectParameters;
coinbase?: CoinbaseWalletParameters;
}
interface WidgetConfig {
// ...
walletConfig?: WidgetWalletConfig;
}
```
### Connect wallet button
Using internal wallet management clicking the `Connect wallet` button triggers the opening of an internal wallet menu. In cases where external wallet management is used we provide `onConnect` configuration option. This option allows developers to specify a callback function that will be executed when the `Connect wallet` button is clicked.
Please see modified RainbowKit example below. Here we use `openConnectModal` function provided by `useConnectModal` hook to open RainbowKit wallet menu when the `Connect wallet` button is clicked.
```typescript WidgetPage.tsx theme={"system"}
import { LiFiWidget } from "@lifi/widget";
import { useConnectModal } from "@rainbow-me/rainbowkit";
import { WalletProvider } from "../providers/WalletProvider";
export const WidgetPage = () => {
const { openConnectModal } = useConnectModal();
return (
);
};
```
```typescript WalletProvider.tsx theme={"system"}
import { formatChain, useAvailableChains } from "@lifi/widget";
import { RainbowKitProvider, getDefaultConfig } from "@rainbow-me/rainbowkit";
import { useMemo, type FC, type PropsWithChildren } from "react";
import type { Chain } from "viem";
import { WagmiProvider } from "wagmi";
import { mainnet } from "wagmi/chains";
export const WalletProvider: FC = ({ children }) => {
const { chains } = useAvailableChains();
const wagmiConfig = useMemo(() => {
const _chains: [Chain, ...Chain[]] = chains?.length
? (chains.map(formatChain) as [Chain, ...Chain[]])
: [mainnet];
// Wagmi currently doesn't support updating the config after its creation,
// so in order to keep the dynamic chains list updated, we need to
// re-create a config every time the chains list changes.
const wagmiConfig = getDefaultConfig({
appName: "LI.FI Widget Example",
chains: _chains,
projectId: "Your WalletConnect ProjectId",
ssr: !chains?.length,
});
return wagmiConfig;
}, [chains]);
return (
{children}
);
};
```
### WalletConnect and Coinbase Wallet
We provide additional configuration for WalletConnect and Coinbase Wallet Wagmi connectors so when using built-in wallet management 中 widget you can set WalletConnect's `projectId` or Coinbase Wallet's `appName` parameters.
```typescript theme={"system"}
import { LiFiWidget, WidgetConfig } from "@lifi/widget";
const widgetConfig: WidgetConfig = {
walletConfig: {
walletConnect: {
projectId: "Your Wallet Connect Project Id",
},
},
};
export const WidgetPage = () => {
return (
);
};
```
### Partial 钱包管理
Your external wallet management may not support all ecosystems provided by our widget, or you may be 中 process of migrating to a new setup. To help with these cases, we've got you covered!
The `usePartialWalletManagement` configuration option allows the widget to offer partial wallet management functionality. When enabled, this option provides a hybrid approach, effectively combining both external and internal wallet management.
In partial mode, external wallet management is used for "opt-out" providers, while internal management applies to any remaining providers that do not opt out. This setup creates a flexible balance between the integrator’s custom wallet menu and the widget’s native wallet menu, ensuring a smooth user experience across all ecosystems, even if external support is incomplete or in transition.
```typescript theme={"system"}
import { LiFiWidget, WidgetConfig } from "@lifi/widget";
const widgetConfig: WidgetConfig = {
walletConfig: {
usePartialWalletManagement: true,
},
};
export const WidgetPage = () => {
return (
);
};
```
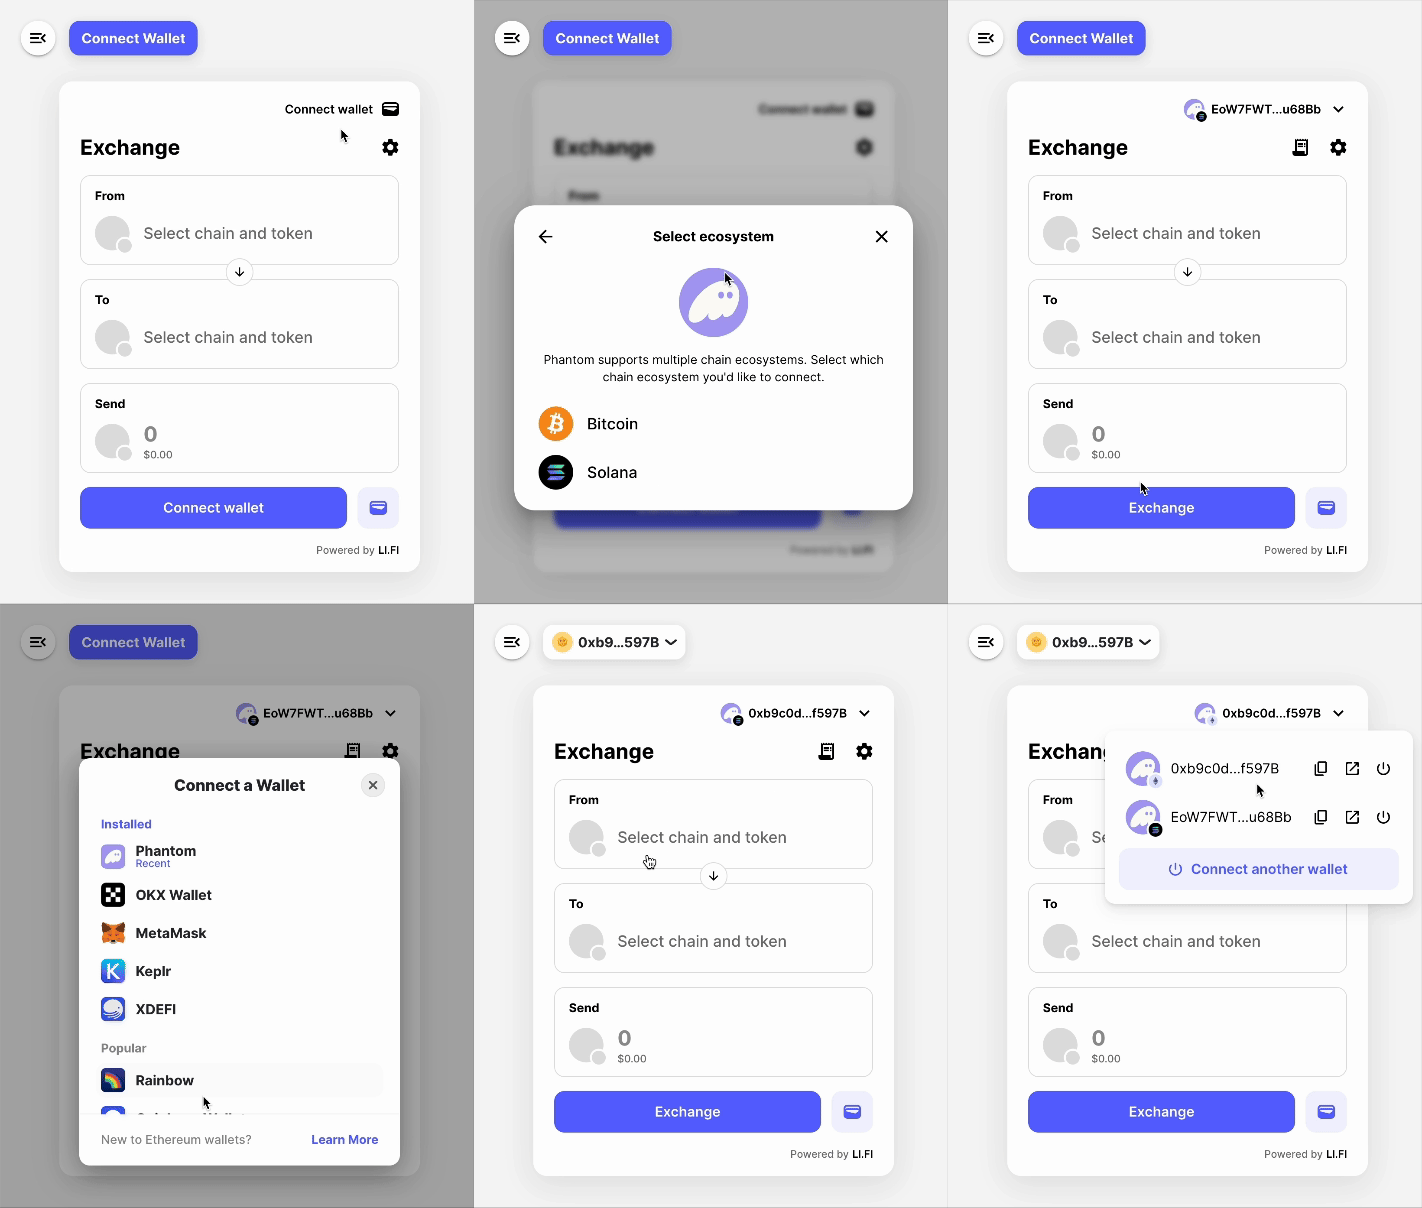 As shown 中 example above, this setup allows both the integrator's and the widget's wallet menus to operate together, each supporting different ecosystems. In the example, RainbowKit manages EVM wallet support, while the internal wallet menu handles Solana and Bitcoin.
### Force Internal 钱包管理
The widget automatically detects existing wallet contexts (e.g., WagmiContext for EVM) higher up in your React tree. When found, it disables its own wallet management for that ecosystem and
uses your existing setup instead.
To override this behavior and force the widget to manage all wallets internally, set `forceInternalWalletManagement: true`. This ignores all external wallet contexts, for every ecosystem.
```typescript theme={"system"}
import { LiFiWidget, WidgetConfig } from "@lifi/widget";
const widgetConfig: WidgetConfig = {
walletConfig: {
forceInternalWalletManagement: true,
},
};
export const WidgetPage = () => {
return (
);
};
```
### Ecosystem order for wallets
The `walletEcosystemsOrder` option allows you to define the preferred order of ecosystems (e.g., EVM, SVM) for each multichain wallet.
```typescript theme={"system"}
import { LiFiWidget, WidgetConfig } from "@lifi/widget";
import { ChainType } from "@lifi/sdk";
const widgetConfig: WidgetConfig = {
walletConfig: {
walletEcosystemsOrder: {
MetaMask: [ChainType.EVM, ChainType.SVM],
Phantom: [ChainType.SVM, ChainType.EVM],
},
},
};
export const WidgetPage = () => {
return (
);
};
```
The keys (e.g., "MetaMask", "Phantom") must match the wallet names as labeled 中 Widget UI. The associated array specifies the priority of ecosystems for that wallet, with any unlisted ecosystems shown afterward. This setting only affects the display order 中 UI and does not limit actual ecosystem support.
### Smart Accounts 兼容性
When using the LI.FI Widget with smart accounts and smart account providers like Privy, Dynamic, ZeroDev, and others, you may encounter compatibility issues related to signature formats.
Smart accounts often use different signature standards than traditional Externally Owned Accounts (EOAs):
* **EOAs** use ECDSA signatures for standard transactions
* **Smart Accounts** may use ERC-1271 or other signature validation methods
This difference can cause incompatibility with native permit functionality (EIP-2612) that the widget uses for gasless token approvals. When smart accounts cannot produce the expected ECDSA signature format for permit transactions, the widget may encounter errors (like `Invalid yParityOrV value`) during execution.
#### EIP-5792 Transaction Batching Support
If your smart account provider or implementation supports [EIP-5792](https://eips.ethereum.org/EIPS/eip-5792) (Wallet Function Call API), there should be no compatibility issues. EIP-5792 enables transaction batching, allowing multiple operations (like token approvals and swaps) to be bundled into a single batch transaction. This eliminates the need for separate permit signatures and provides a smoother UX.
When EIP-5792 is available, the widget will automatically use batch transactions instead of individual permit signatures, resolving smart account compatibility issues.
#### Disabling Message Signing
For smart accounts that don't support EIP-5792 or when encountering signature-related errors, you can disable message signing by configuring the `disableMessageSigning` option 中 SDK configuration. This will prevent the widget from attempting to use incompatible permit-based approvals that require message signing.
```typescript theme={"system"}
import { LiFiWidget, WidgetConfig } from "@lifi/widget";
const widgetConfig: WidgetConfig = {
sdkConfig: {
executionOptions: {
disableMessageSigning: true,
},
},
};
export const WidgetPage = () => {
return (
);
};
```
Disabling message signing will fallback to standard token approval
transactions, which may require additional gas fees but ensures compatibility
with all smart account implementations.
For more details about execution options, see the [执行路由 documentation](/sdk/execute-routes#disablemessagesigning).
As shown 中 example above, this setup allows both the integrator's and the widget's wallet menus to operate together, each supporting different ecosystems. In the example, RainbowKit manages EVM wallet support, while the internal wallet menu handles Solana and Bitcoin.
### Force Internal 钱包管理
The widget automatically detects existing wallet contexts (e.g., WagmiContext for EVM) higher up in your React tree. When found, it disables its own wallet management for that ecosystem and
uses your existing setup instead.
To override this behavior and force the widget to manage all wallets internally, set `forceInternalWalletManagement: true`. This ignores all external wallet contexts, for every ecosystem.
```typescript theme={"system"}
import { LiFiWidget, WidgetConfig } from "@lifi/widget";
const widgetConfig: WidgetConfig = {
walletConfig: {
forceInternalWalletManagement: true,
},
};
export const WidgetPage = () => {
return (
);
};
```
### Ecosystem order for wallets
The `walletEcosystemsOrder` option allows you to define the preferred order of ecosystems (e.g., EVM, SVM) for each multichain wallet.
```typescript theme={"system"}
import { LiFiWidget, WidgetConfig } from "@lifi/widget";
import { ChainType } from "@lifi/sdk";
const widgetConfig: WidgetConfig = {
walletConfig: {
walletEcosystemsOrder: {
MetaMask: [ChainType.EVM, ChainType.SVM],
Phantom: [ChainType.SVM, ChainType.EVM],
},
},
};
export const WidgetPage = () => {
return (
);
};
```
The keys (e.g., "MetaMask", "Phantom") must match the wallet names as labeled 中 Widget UI. The associated array specifies the priority of ecosystems for that wallet, with any unlisted ecosystems shown afterward. This setting only affects the display order 中 UI and does not limit actual ecosystem support.
### Smart Accounts 兼容性
When using the LI.FI Widget with smart accounts and smart account providers like Privy, Dynamic, ZeroDev, and others, you may encounter compatibility issues related to signature formats.
Smart accounts often use different signature standards than traditional Externally Owned Accounts (EOAs):
* **EOAs** use ECDSA signatures for standard transactions
* **Smart Accounts** may use ERC-1271 or other signature validation methods
This difference can cause incompatibility with native permit functionality (EIP-2612) that the widget uses for gasless token approvals. When smart accounts cannot produce the expected ECDSA signature format for permit transactions, the widget may encounter errors (like `Invalid yParityOrV value`) during execution.
#### EIP-5792 Transaction Batching Support
If your smart account provider or implementation supports [EIP-5792](https://eips.ethereum.org/EIPS/eip-5792) (Wallet Function Call API), there should be no compatibility issues. EIP-5792 enables transaction batching, allowing multiple operations (like token approvals and swaps) to be bundled into a single batch transaction. This eliminates the need for separate permit signatures and provides a smoother UX.
When EIP-5792 is available, the widget will automatically use batch transactions instead of individual permit signatures, resolving smart account compatibility issues.
#### Disabling Message Signing
For smart accounts that don't support EIP-5792 or when encountering signature-related errors, you can disable message signing by configuring the `disableMessageSigning` option 中 SDK configuration. This will prevent the widget from attempting to use incompatible permit-based approvals that require message signing.
```typescript theme={"system"}
import { LiFiWidget, WidgetConfig } from "@lifi/widget";
const widgetConfig: WidgetConfig = {
sdkConfig: {
executionOptions: {
disableMessageSigning: true,
},
},
};
export const WidgetPage = () => {
return (
);
};
```
Disabling message signing will fallback to standard token approval
transactions, which may require additional gas fees but ensures compatibility
with all smart account implementations.
For more details about execution options, see the [执行路由 documentation](/sdk/execute-routes#disablemessagesigning).